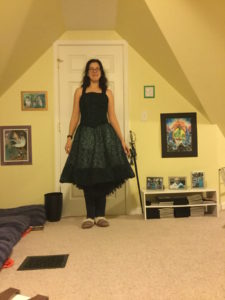
As it turns out, the bodice on my foofy holiday dress was an adventure, too. From its original placement on the dress form, I pinned darts to the sides of and beneath the bust. I folded down the top hem the rest of the way the way around (with some shaping of course) and worked on the alignment of the back closure. That called for a couple more folds along the side. When I took the pinned monstrosity off the dress form, it was sort of like a flimsy little sculpture. With periodic adjustments, I sewed all of the folds and darts into place.
Then, since the final fabric is more or less sheer, I got out more liner. I had a piece suitable for the front (but not the back) of the bodice, so I decided to let the back stay see-through. I only needed darts below the bust for the liner, which I sewed first, and I folded the top hem and sides against the corresponding parts of the bodice and overstitched them together. Then I tried putting the result on.
That’s when I discovered that the dress form, although adjustable, was not quite at my measurements. It was, in fact, slightly more endowed. And the bodice wanted to flap down a bit, too. Luckily, I’d recently bought a sports bra that for some reason known only to the manufacturer came with removable cups, so I inserted them between the layers, decided I liked the result, and added a seam below the bust to secure them in place.
At about this point, too, I got out the rest of the cheap black velour from Irene and cut a long strip for straps. I turned it inside out, stitched one long seam all the way down, and turned it right side out again before figuring out where to place them. I wanted it to be extra secure, so I criss-crossed them in back (and set the fit on my own body this time!).
Then it was time to play with the bottom of the bodice and attaching it to the skirt. My default was ending the bodice in a v, since that’s the way the fabric was cut when it came to me. I was inclined to keep it that way, since it provides a fun bit of historical flair. I separated bodice and liner below the waist, putting its liner behind both the skirt and its liner, then cut an extra piece of liner to go in front of the skirt and eventually attach to the bottom of the bodice front – I figured that arrangement would make the seam stronger. I sewed those four layers together with a zigzag stitch(!), lost some layers partway through, and had to back up to reconfigure.
Then I had to deal with the bottom bodice hem. I pinned the bodice and its new liner together, planning to overstitch. The liner fell out completely. I hand sewed it into place. I turned under the original liner and hemmed that, too. Then I tacked the bodice onto the skirt in a few places. It puckers a little bit, and the V isn’t quite symmetrical, but it’s not too bad for probably assembling in reverse order to what I should have done.

I decided I did like the contrast of dark green against the part of the skirt lightened by the blue…though this was in the mirror, and I’m not as sure about the darker strip at the bottom. I finished rolling over and stitching the skirt’s and its liner’s waistbands, and then I figured out where I could put the laziest possible folds and tucks in the back to snug it up. Finally I begged some hooks and eyes from the costume shop at the theatre where I’m helping hold book for a show right now, and I came home and finished it all up!