Back to costumes! Immediately after I finished my holiday dress, I wrestled my old powder blue floral prom dress onto the dress form. I’d been wanting to use it as the base for a historical gown for ages, and I’d just retrieved it from my mom’s house in the great stuff shuffle of 2016. Then I went to my costume textbook for reference information. I really wanted to split the overgown down the front, and display the prom dress as a fancy “petticoat”. That design inspiration meant I had two major choices: Elizabethan or Baroque.
A portrait of Elizabeth I as a princess that was printed in my costume textbook; here, of course, simply lifted from elsewhere on the internet.A portrait of Rubens’ wife, also printed in my costume textbook and again lifted from the internet. There was another I preferred in the book, but didn’t find quickly online.
Then I realized the prom dress was A-line, which means whatever I end up with is going to be some kind of fantastical mashup. And whenever I get around to really making dresses from those eras, period undergarments are going to be a must.
Still, I dug around in my fabric stash to see what would suit. Most of the cool colors were so dark they washed out the powder blue, but ultimately I found some shiny darker blue I like quite a lot. I got it draped around the dress form (inside out!) and found I was terrified to start cutting. So it looked like I would have to finally go through the extra steps so often recommended of building a mockup.
As it turns out, the bodice on my foofy holiday dress was an adventure, too. From its original placement on the dress form, I pinned darts to the sides of and beneath the bust. I folded down the top hem the rest of the way the way around (with some shaping of course) and worked on the alignment of the back closure. That called for a couple more folds along the side. When I took the pinned monstrosity off the dress form, it was sort of like a flimsy little sculpture. With periodic adjustments, I sewed all of the folds and darts into place.
Then, since the final fabric is more or less sheer, I got out more liner. I had a piece suitable for the front (but not the back) of the bodice, so I decided to let the back stay see-through. I only needed darts below the bust for the liner, which I sewed first, and I folded the top hem and sides against the corresponding parts of the bodice and overstitched them together. Then I tried putting the result on.
That’s when I discovered that the dress form, although adjustable, was not quite at my measurements. It was, in fact, slightly more endowed. And the bodice wanted to flap down a bit, too. Luckily, I’d recently bought a sports bra that for some reason known only to the manufacturer came with removable cups, so I inserted them between the layers, decided I liked the result, and added a seam below the bust to secure them in place.
At about this point, too, I got out the rest of the cheap black velour from Irene and cut a long strip for straps. I turned it inside out, stitched one long seam all the way down, and turned it right side out again before figuring out where to place them. I wanted it to be extra secure, so I criss-crossed them in back (and set the fit on my own body this time!).
Then it was time to play with the bottom of the bodice and attaching it to the skirt. My default was ending the bodice in a v, since that’s the way the fabric was cut when it came to me. I was inclined to keep it that way, since it provides a fun bit of historical flair. I separated bodice and liner below the waist, putting its liner behind both the skirt and its liner, then cut an extra piece of liner to go in front of the skirt and eventually attach to the bottom of the bodice front – I figured that arrangement would make the seam stronger. I sewed those four layers together with a zigzag stitch(!), lost some layers partway through, and had to back up to reconfigure.
Then I had to deal with the bottom bodice hem. I pinned the bodice and its new liner together, planning to overstitch. The liner fell out completely. I hand sewed it into place. I turned under the original liner and hemmed that, too. Then I tacked the bodice onto the skirt in a few places. It puckers a little bit, and the V isn’t quite symmetrical, but it’s not too bad for probably assembling in reverse order to what I should have done.
Again, bummed I lost a rare progress shot – the skirt is actually all in front of me & unfastened in this do-over!
I decided I did like the contrast of dark green against the part of the skirt lightened by the blue…though this was in the mirror, and I’m not as sure about the darker strip at the bottom. I finished rolling over and stitching the skirt’s and its liner’s waistbands, and then I figured out where I could put the laziest possible folds and tucks in the back to snug it up. Finally I begged some hooks and eyes from the costume shop at the theatre where I’m helping hold book for a show right now, and I came home and finished it all up!
Filed fabrics – with bonus cat! (Actually, I am given to understand cardboard boxes are not great for fabric – something about the glue, etc., etc. Plastic is better. However, I am hopeful that this new knowledge [and this blog] will incentivize me to zoom through lots of projects quickly, making its storage longevity moot.)I actually “filed” all of my fabric when I re-organized the basement last month. Turned each banker’s box on its side, re-folded and placed each piece of fabric so that when it was full I’d be able to see a bit of each so that I could plan new projects faster and more neatly. Well, a new project wormed its way into my brain. As I teased in my last post, there’s a gauzy green that really wanted to become a foofy holiday dress!
So last week, I pulled Cersei off the dress form, got out the fabric, and … worried. There wasn’t much. A big chunk that might just provide the skirt front and back. Two more chunks for skirt side panels – this thing wants to be foofy, remember – and one more chunk for the bodice. I folded over the top of the bodice piece and pinned it to the front of the dress form, then wrapped it around to see if it would meet in the back. It did, barely.
I figured from there I was safe to cut out the skirt. I got out my yellow polka dot dress (the actual dress, not the pattern!) to roughly copy the front panel, and did indeed manage to get the back panels from what was left of that chunk. In retrospect, I should have made the waist measurements on all three a bit smaller, since I followed that up by trimming the other two strips of fabric for the side panels.
I realized I was going to need a liner and something to help add poof, so I grabbed a bunch of black fabric and some black floral lace and took everything upstairs to where my sewing machine – and electricity! – were waiting. I cut parallel panels for the skirt liner, stacked skirt and liner in two piles, and put each one together. Since I wasn’t too concerned about the exact final length, I then hemmed each one.
Then I started ruffling the lace. Using the longest stitch possible, I put two parallel seams in the top of the lace as close together as possible. I gathered the seams tightly on the first one, and compared my results with the circumference of the skirt. The three pieces I had were not going to cover the entire hem. Luckily, this was a lace-y fabric, not something with a defined edge, so I cut each of the pieces in half horizontally and gathered them all. I decided I wanted the lace to hang about an inch below the hem, placed it appropriately, and sewed it on. (I should note that I decided the “right” side of the liner would be oriented towards the wearer, so the lace covered the rough edge of the hem on the side that would ultimately be facing the skirt.)
I tried both layers on, and discovered that 1) there was way too much waist, and 2) there was nowhere near enough “foof”. So I went back down to the basement, grabbed the light blue version of the floral lace, and started cutting it into strips. I ended up sewing two more layers of ruffle to the entire circumference of the liner, with each layer sewn high enough above the previous one to (mostly?) prevent overlap. That left an extra several inches bare on top, so I rolled the waistline over several times andbasted it in place. I wasn’t quite sure how I felt about the blue
The funny thing is, I swear I had a progress shot on the dress form…but since it’s been lost to the ether, you’ll have to settle for it being laid on the ground! Hem’s on the left, obviously.
lightening the color of the top of the skirt. I thought for a moment that I could simply reverse the liner and put the ruffles facing the wearer, but that would crush them and the expected foofiness. I figured I’d better wait until the bodice was ready to see if I liked the contrast before deciding to add a second liner on top. And so will you!
And then I got my first commission! By which I mean a friend was looking for someone to make something for their daughter, and I volunteered.
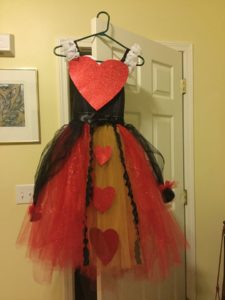
Do you know about tutu dresses? I didn’t. I saw the inspiration picture of a Queen of Hearts tutu dress, had a brief moment of panic when I thought I would have to call up the lady who graciously provided most of my stash to say “help! how I can I get layers and layers of tulle to behave in the sewing machine?!” (she is an experienced tutu maker as well), and then realized that somehow those strips were knotted on.
Luckily the internet is an expert in tutu dresses. I used this lovely blogger’s work as a loose guide (and somewhat regret not following the recommendation to get a crochet top to use as the base, having instead raided my stash for a strip of trim that could be coaxed into a similar configuration). For anyone familiar with latch-hooking yarn rugs, you may be interested to know that the process is about the same, but with giant strips of tulle, larger holes (ideally), and, if you’re smart and/or multi-crafty, a crochet hook.
Tulle is not something I have in my stash, and the friend was perfectly happy to pay for materials, so off I went to JoAnn Fabrics. I happened to hit the store at sale time, so I was able to get the narrow spools of tulle cheaper than buying a giant rectangle of fabric and cutting the strips out myself. Thank goodness. On the other hand, I carefully obeyed the request for “sparkly” and as I latch-hooked the skirt I ended up subjecting my house to an infestation of glitter. (Friend, of course, already has an irremovable colony and was not in the least perturbed.)
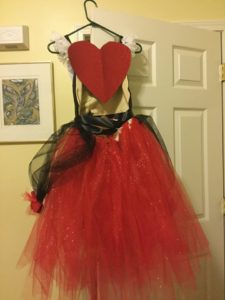
The other instruction was “grow with her” which I took as my biggest design feature. The bodice basically is an apron top draped on my (adult size) dress form. The hearts are glitter paper and velcro on, so they can shift up/down if needed. There’s lots of extra strap on the shoulder, designed to be let down an inch at a time. The back heart just kind of hangs, depending on gravity to sit where it’s supposed to (and is even more adjustable with its velcro). There’s a ribbon at the waist that will tie in front for now and can shift to tying in back as she grows.
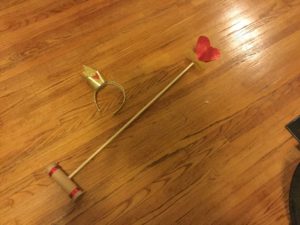
Other materials details: the black ribbons for border and waistband are from my stash, as is the white lace on the shoulder, and both exterior and interior of the “apron” bodice. The wearer will always have a t-shirt and leggings on underneath (and the tulle still tangles, so adding an underskirt might be a good choice). The crown and wand were more glitter paper (the gold very stiff and almost plasticky), a dowel, and a headband also from JoAnn. The part I got most excited about (having innovated a bit) is making the wand double as a “croquet mallet” (not actually good for hitting anything, but the shape is right, since I used one of the tulle spools).
The front view.The back view (gold inside hidden by wearer of course).
I’m about five and a half hours into sewing Cersei (general intentions are here, if you missed them), and it’s been an adventure. No major disasters, but so many little things have gone wrong:
– Staystitch side edge of front above waist. Well great, I didn’t mark the waist. Guess I’m eyeballing it. (No ill effects obvious to date.)
– Stitch upper side front to lower side front. Um…you’ve got an outie and an innie…how do I sew those together? Incorrectly, the first time. (The intermediate step of staystitching the lower edge of the upper side front [the innie] means you can stretch it along the outie for stitching and then afterwards it sort of flexes back into place.)
– Stitch side front to front. The hems line up wrong, and not the way I planned. So much for the brilliant curtain hem intentions. It’ll all turn out fine when I put in the final hem.
– Basically repeat the above for the back and side back. I should probably mention here I’m too lazy to use pins, except for really tricky spots. The bigger mistake is keep forgetting to reverse the stitch at the beginning and end of my seams, to lock them in place…
– As mentioned, I’m skipping the ties.
– Stitch front to back. It finally starts to look like a thing! It’s not super fitted, so I could take in some seams if I wanted, but I think it looks okay. I’ll just have to be very specific about the hemming the front flap so it doesn’t spill over into the contrast section.
– The facing is really where it started getting weird. I hemmed the lower edge of the front, but I typically don’t press, so I missed turning in the seam allowance. And the hem of the back facing is atrocious – another outie, so it’s all wrinkled and overlapped. Stitched front to back okay, but then:
– I added the improvised collar when I stitched the facing to the dress. That step was mostly fine, but when I understitched the facing, I caught a bunch of extra fabric in several different spot and had to rip it out and re-stitch piecemeal (if I did the whole seam over again, it would probably just be worse.)
– Then, it didn’t actually say to, but I slipstitched the lining hem (instead of the armhole facing. And I had it on the dress form by this point. And the slipstitch went through the incredibly thin fabric covering the dress form. So I had to do that over.
– Finally, it was sleeve time! I got all the giant pieces together just fine, but then I started adding the sleeve band and my extra piece of darker contrast. As a single seam, they went on fine. But then I had to slipstitch both the band and the rest of the darker contrast. And I caught lots of bits of the outer sleeve fabric…that was folded under from another part of the sleeve. So I had to fix that, too. I finally got the first sleeve done and am hoping to avoid that problem when I pick up on finishing the second sleeve.
Normally the next step after this would be attaching sleeves to dress, but I am going to have a lot of quiet down time away from home next week, so I think I’ll work on embroidering the sleeves (which even though voluminous are smaller than the dress) before I attach them.
There’s one more big project I want to get done before Comic Con: a pair of Game of Thrones costumes. Needless to say, it’s incredibly daunting because the costuming on that show is simply gorgeous. I don’t have the right fabrics in my stash, and let’s be honest the publicly available designs are kind of a hack. But I’m going to try. (Full disclosure, I’m making full use of some wibbly-wobbly timey-wimey … stuff, here: I actually wrote this post in late September! So I’m not as hugely time crunched as you might think. EDIT: once we decided on only one day at Comic Con, though, this became a “work at your own pace” project – for good or ill, only time will tell.)
So for our first pair (yes, there’s at least one more coming at a later date), Jeff and I are going to go as Jaime and Cersei and loiter in corners and hopefully really amuse people. Starting with Cersei:
I would have loved to do one of her high collared brocade dresses but my stash doesn’t even come close. Even the blue or pink wrap dress would be a little less popular, and I don’t really like following the crowd. But reds I’ve got, so red it is. (McCall’s 6940, of course.) The base red from my stash is actually a bit deeper, and the fabric a bit thicker, than the reference photos I’ve seen suggest. In terms of quantity, I’m limited to just the body – bodice and center front and center back – out of the deep red, which might be a silk. It’s got a lovely visual texture to it (though probably not so nice on the skin, and the bright spots that pop from those pin lines match a gauzy, slightly shiny red curtain I thrifted that I’ll be using for the sleeves. (I did manage to save some of the deep red for the peekaboo on the inside of Jaime’s collar, so that’ll be a fun touch!) I’ve also decided to forgo the recommended ties, since you can’t see them in screenshots, and will probably use more of the stick on velcro dots in my stash. I also don’t actually have any red thread, so am thinking I will try to make do with brown; it’s fairly light and shiny, so shouldn’t be that far off.
I’m satisficing on the contrast color, too. Again, from reference photos, it looks like a lighter and darker gold (but not shiny) brocade, whereas I’ll be using the “inside” of a pair of gold satiny curtains for the side fronts and backs, bodice lining, and the sleeve lining and trim. The pattern doesn’t call for it, but I’m using it for a collar as well, plus scraps from my gold bridesmaid’s dress as a darker contrast at the outside edge of the sleeve lining. I do at least have beige thread for places where that matters.
I refuse to use the enclosed lion appliqué as intended (and the fact that I’m out of dark red actually doesn’t have anything to do with it!); I’m determined to simply use the shape to mark the space in which to embroider them (as well as the sleeve hems and neckline). I’ve done a decent amount of cross-stitch and some needlepoint (though all very slowly), so I think it’s at least doable, if not in the time allotted. I did find a photo of one cosplayer who appears to have used puff paint for her sleeves, which I think is very clever, and if timing does become an issue I may go that route for some of my detailing.
I’m not intending to use the pattern at all for the belt. I have some dark gold trim that I think might be an okay substitute for the back of it (since I don’t have any gold chainmail lying around); I’m not sure how I’ll handle the leather or metal buckle yet. Maybe painted cardboard? At least there are some really nice reference photos.
So, caveats made, I can report that I have cut out all of the fabric for Cersei (making strategic use of the curtains’ hems for side front, side back and sleeves). I’ve probably set myself up for more of the trouble I had with the Sherlock vest and renaissance man‘s doublet, since I cut to the largest size but am once again going to be fitting different sections to different sizes. At least I have a dress form (should probably go spin the dials to match my current measurements…) and of course 100% access to putting the thing on my own body as I go.
I did order a $5 replica of Cersei’s lion necklace off eBay, because with all of the embroidery plans, and my lack of carving/molding skills, that seems like the best way to make sure I actually have one. I’m not sure whether she should have a signet ring in this costume or not. I guess I’ll cross that bridge when I come to it.
Let me tell you, this costume was a long time coming. I started on it a year or two ago, and chickened out just before I got to the zipper. So it sat and sat in the basement until we finally made that commitment to go to the ren fair, and I sewed my little fingers off making costume after costume.
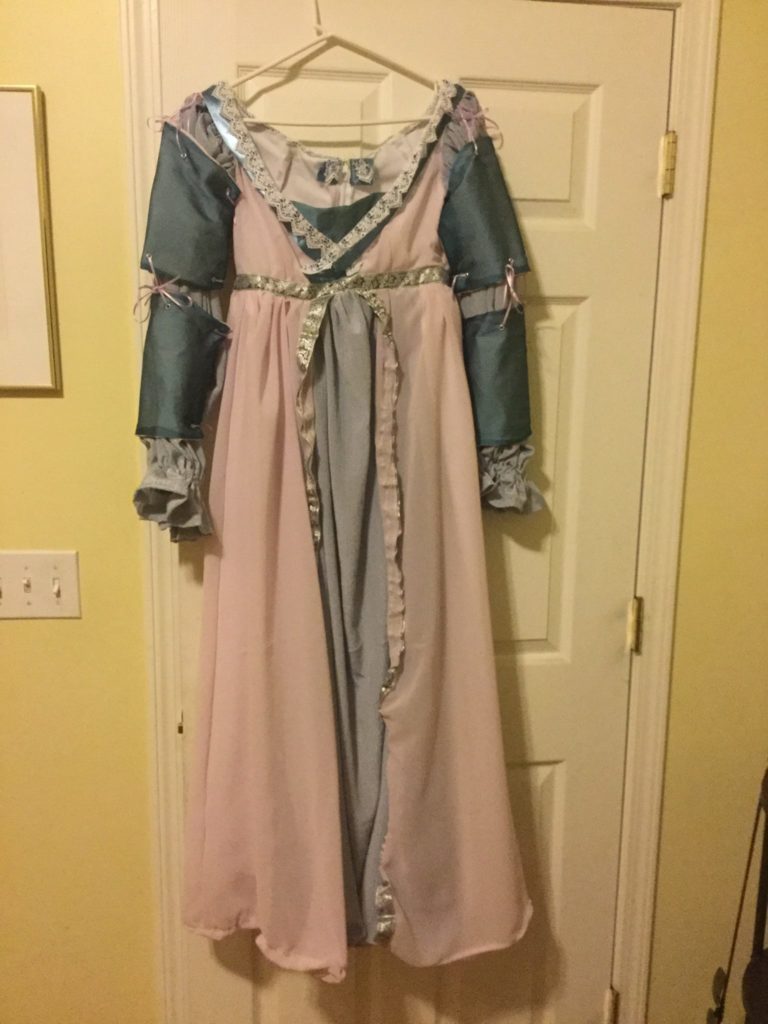
I call it my fantasy renaissance dress. The pattern is pretty good, actually (Simplicity 8735), but the fabrics I’m using are incredibly synthetic. Piecing it together from my stash felt a bit like a work of art. I had enough light blue textured fabric for the front panel and the sleeves, enough sheer purple fabric for the overdress and what I’ve been calling the “gauntlets”, enough white fabric for the underdress minus the front panel (well, except for a little missing chunk), and enough dark blue sheer fabric for the modesty panel and the “gauntlets”.
I don’t really remember assembling the bodice or the skirt, it’s been so long. I do think I was surprised how well that portion went. I definitely remember the silver fleur-de-lis ribbon I grabbed from my stash to line the waistline and the edges of the overskirt crinkled like mad. Leaving it on my dress form for months on end actually helped it flatten a bit, but it still pulls up some. I went wild at JoAnn buying extra ribbon and lace for the bodice, which admittedly looks very nice. I hand sewed it on during a D&D session. And then it sat.
I got it out again this summer and finished gathering the sleeves. I repeated the USB cable trick to shove elastic through the gather. And then, terrified it wouldn’t fit, I sewed in the zipper. Wrong. Twice. Once I got the zipper in right-way round so that it could, you know, zip…it fit! Sort of. The bodice kept falling off my shoulders, I found a shortcut – put a dart in the neckline above each shoulder blade. I think I took 4 inches off! I hemmed the underdress and overdress (cheating, by machine) both a bit shorter than I’d intended but the ankle-length result turned out to be a perfect choice for the ren fair, what with all the mud. And I made one set of reversible oversleeves and set their grommets (tricky with that flimsy fabric!). Pre-lacing them was a mistake, as one shoulder then didn’t want to sit right, but one came untied partway through the day and I tucked all of them away.
Of course, a dress does not itself an outfit make! I grabbed brown velvet slippers at the costume shop, wore a necklace that had been my grandmother’s, and approximated a cap, ferroniere, and Italian style hair wrap out of a yarmulke and ribbon. Cheating, I know. I also carried a bag my aunt and uncle bought for me in southeast Asia that color coordinated nicely. I’d like to build an actual cap, add a dangling “jewel” to the ferroniere (or actually buy a real one), tie down the wrap tighter so it doesn’t come undone, and use the bit of brocaded silk in my stash to make a new handbag for future outings. Plus, like Irene, it could use a couple of petticoats.
Once again, we were invited to participate in the costume contest, but with better shoes (and extra arch support tucked inside!) we wandered far and wide for food, vendors, and entertainment. All in all, a lovely day, even if my outfit was a century out-of-date and several hundred miles south. Frankly, I prefer this profile to the wide skirts and stiff bodices of the Elizabethan court.
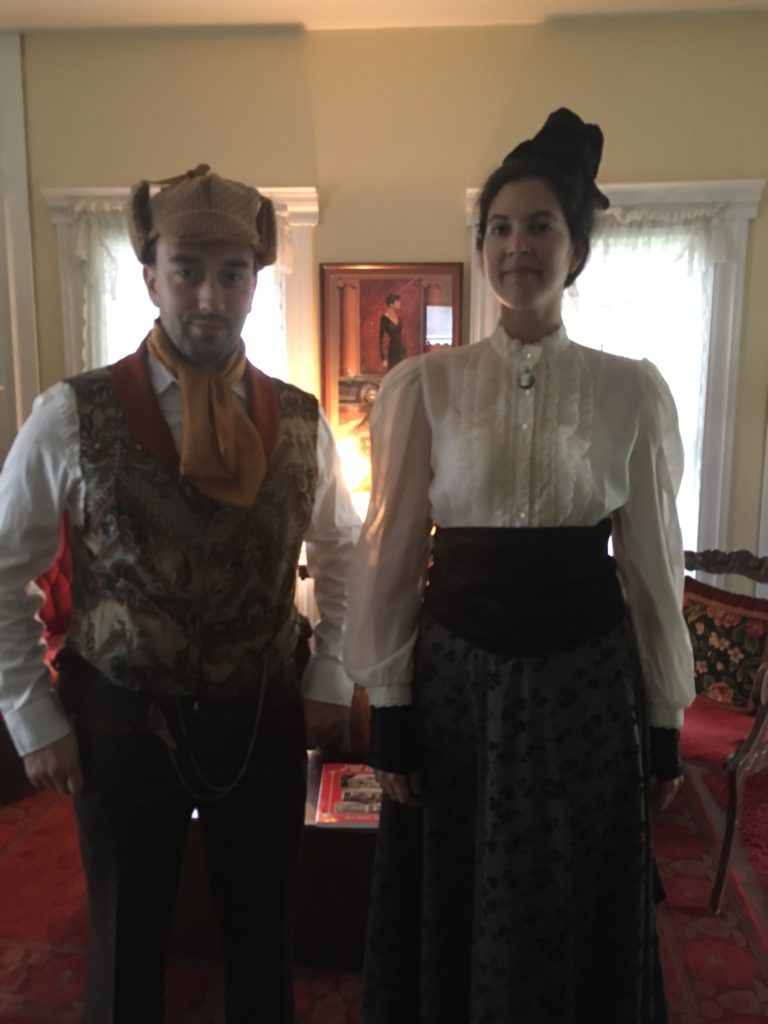
So Irene. Irene was a bit of a hang-er on, but I like couples’ costumes. So with steampunk Sherlock Holmes on the docket, what else was I supposed to do?
(I did actually end up thinking of a fun little narrative that blended real life and our personas: Irene’s supposedly given up her wicked ways and turned tailor to Sherlock. Of course it’s all just a ploy to get close enough to slip him something nefarious. *turn to look at him* “You didn’t hear that dear, just go on and investigate that odd thing over there.” Etc.)
Most of the outfit was already made. The skirt was actually the second version of that set I had made, since I sewed (except for the hem) a shiny brown version for my friend’s wedding outfit (which she combined with a lacy white shirt and beige corset to look amazing). Here’s the best part: it’s a mash up: bolero skirt (without loopy trim) from McCall’s 7071 and train from McCall’s 6097. My skirt was a dull green covered in black velvety flowers with a dark green velvet waistband (from the stash!), and my train was a darker shinier green (which I may have purchased). The only thing I actually had to do for the ren fair was add buttons to attach the train to the skirt. So…repeat semi-freehand note from Sherlock’s vest.
The top I’ve had for a long time; it was a hand-me-down from my mom. I searched antique shops for a cheap cameo for a long time, and the result has been hanging from the top button hole for quite a while as well.
I could’ve just used the good black leather boots I’ve owned since high school, but I ran into a pair at the thrift store with silver buttons on the side just before the ren fair and couldn’t resist. This. Was. A. Giant. Mistake. They were way too big and I had enormous blisters starting on the balls of my feet before we even got into the ren fair because we parked at the back of beyond. I thought about buying shoes from a vendor, but they were ridiculously expensive. So I begged a wad of napkins off a pickle vendor and stuffed them into my shoes. It helped enough that we could move around a little, and kept the blisters from getting worse. But I’ll be cleaning the mud off those shoes and sending them back to the thrift store. Lesson: always, always walk around in your shoes. *sigh*
How how else did I dress it up? I bought half a yard of cheap black velour and built a steampunk hat and fingerless gloves (McCall’s 6975 again) and a cummerbund or waist corset (patternless!). The hat turned out to be good practice for Sherlock, and the gloves…I had to think hard about those gloves – which side was up, which hand was which. I ended up pulling some shiny black fabric from my stash to line the thumb and wrist, and to make a flat version of what was supposed to be a crinkled connector to pin the palm side shut. And I did all three in an afternoon! The amazing thing about the hat is once I pinned it on top of my head, I completely forgot it was there.
We also borrowed a parasol from the theatre props in our basement, but didn’t end up using it. I think eventually I might like to build her a matching one with a more period-appropriate profile. And I’ll admit I saw a poison ring at the same antique shop where we picked up Sherlock’s stick pin that was quite tempting.
I keep wanting to transition from costumes to historical clothing, though, and having the costume contest judge say it was only “kind of” 1890s really drove that home. I read on a historical clothing blog that the important thing is starting with the right undergarments to build the silhouette. I can improve this costume while setting the stage for future outfits simultaneously. I’ve got a pattern for chemise, drawers, and corset already, and clearly it also needs couple of petticoats and possibly a bustle. So we’ll see where that gets it.
Hi there. I’m Elianna. I like textiles. And science fiction. And fantasy. And therefore, inevitably, cosplay. Historically-accurate garments, too, actually, but I need some more practice before I really go down that rabbithole. (Plus lots of other things, but those will be listed under a different set of tags.)
I was lucky enough to be gifted quite a lot of fabric by a friend of my mom’s. Some of it’s earmarked for particular projects (like the someday costumed trip that Jeff and I will take to Colonial Williamsburg). Some of it isn’t. You’ll see me make some adjustments and trade-offs to make the free fabric work. Because costuming can be an expensive hobby, and I’d like to avoid incurring a lot of cost before I really know what I’m doing.
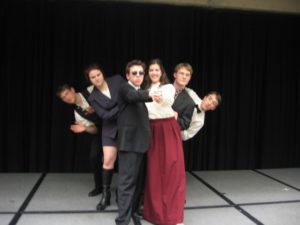
Here’s the red skirt’s final appearance in a high school theatrical production of “Bullshot Crummond”. Think awkward James Bond.
I learned to use a sewing machine pretty young, if by “use” you mean “put in a straight stitch”. I think I was 7 or 8. My mom and I made a lap quilt together using t-shirts and bias tape. I really got going in high school. I started using patterns to make a skirt and vest (then added sleeves) and improvised a (non-matching) cloak.
The bridesmaid’s dress (and matching tie). I grabbed an extra chair sash for my waistband to provide an extra accent in the wedding colors.
I took a costume design class in my college’s theatre department, where they taught me new techniques like how to drape (something I should really try again) and how to use a buttonhole foot (which I’ve clearly forgotten). My mom and I went in on a new sewing machine together. She made my sister a t-shirt quilt, and now the machine is mostly mine. I bought an old dress form cheaply from a friend. Built a chemise, a 1950s style yellow polka dot dress (with two identical [not mirrored] shoulder straps), and a bridesmaid’s dress and matching tie. (Also curtains. So many curtains. Plus a baby quilt for Jeff’s cousin’s kiddo.)
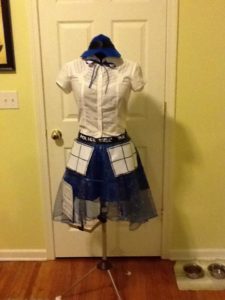
The yellow polka dot dress – perfect for swing!I can’t believe I forgot about the Tardis school girl outfit! I had a major error with the circle skirt, cutting it out using the diameter for the radius. Needless to say, it was shorter than anticipated! If the resolution is good, you should be able to zoom in for a lovely view of the time vortex-y outer skirt. And I was so proud of the freeform cap!Also, accessories for a thrifted 1920s style outfit.
There’s the chemise!
And all of that more or less brings us to the present day and the projects I’ll be covering here!