Irene’s Chemise

Yesterday I built Irene’s chemise. It was…interesting.

Thanks to not marking the indicated stitching lines, I messed up the first two steps – stitching along the stitching lines at the center front neckline and then cutting a slash between them. My first seam cut the corner too quickly, so I had to pull it and redo. I gathered the top edge as instructed and got ready to attach the yoke. I peered carefully at the illustration to orient the yoke correctly, attached each side…and realized that the illustration started at center front. Off the yoke came, turned around, and on again it went. The parallel steps for the back blessedly went more smoothly, except that Tinkerbell kept trying to curl up on my lap.

Then came the sleeves. I got the sleeve oriented wrong side up, the shoulder line underneath it right side up…and sewed the sleeve to the neckline instead of the armhole side. Lather, rinse, repeat. Around this time I looked farther up the pattern instructions and finally noticed the header “Civil War Undergarments”. Yes, ladies and gents, Simplicity 2890 despite complete lack of indications on the outside, is intended for the 1860s. I decided to mentally reassure myself that I did indeed read a while ago that undergarments didn’t change much in the latter half of that century, and move on.

Next up, armhole facings. For once I got the orientation right on the first try, but I incorporated some shortcuts: stitching the non-seam edges down instead of pressing them. Once it was time to turn them under, I machine stitched them again, when they probably should have been hand finished. One of the four pieces also went in about an inch and a half lower than it was supposed to.

Then I put in flat-fell side seams, which was amusing since I’d read about flat-felled seams just last week. Rather than clipping the short edge, I actually set the seam slightly off to begin with – by accident on the first side, on purpose on the second. After that, it was time to face the yoke, at which point I realized I’d only cut one back yoke piece (as illustrated) instead of two. Since the instructions talked about starting with the shoulder seam, and the drawing indicated the same side facing up for front and back yoke, I decided to cut another. I used the selvage for the lower edge intended to be slipstitched to the garment (though of course I machine stitched again). I also sewed the hem, even though that wasn’t mentioned…

Lily wanted to help show off the finished chemise!

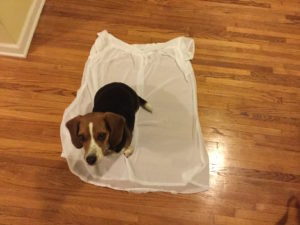
I did decide to use a snap instead of a button, since all of my buttons are quite modern and I’m still terrified of the buttonholer. And that was the final touch on my rather tent-like (aside from the tightly fitted sleeves) late 1800s chemise.


Cutting Irene’s Underthings

It got worse before it got better. Not that it’s gotten better yet.

When we last left the scene, there was fabric everywhere. Now there’s more fabric. Most of the “white to beige” category had absolutely minuscule amounts of yardage, which when compared to the patterns I meant to use were quite dismal. Needless to say, they would not be sufficient. So I hauled out the motherload of very thin, delicate white fabric that’s going to be terrifyingly sheer as chemise and drawers. But at least there’s more than enough beige for Irene’s corset, Regency short stays, and hopefully even the lining of the Regency day dress.

The sewing detritus takes over – or maybe the cat does. And the filing cubby is filling up…

I laid out the white and started cutting the pattern pieces…which is when the cat decided to come “help”. It is possible that I encouraged her, waving strips of scrap in her face, but I take no responsibility for her penchant for lying on crinkly things. Her parking herself on top of the pattern pieces is her own doing.

So far, the chemise is cut, the corset is just about laid out…and the cat has vanished, so I’d better get back to it while I’ve got the chance…


Building a Historical Mashup Gown

The draped dress form prior to cutting of any kind. I really wanted to include a fichu, so I was excited to find a little bit of complementary sheer fabric in my stash to tuck into the neckline!

Having realized I would need to make a mock up for my historical mashup gown, I got out the biggest piece of white cloth I had. I draped it over the top of the other colors I’d chosen, and – still with trepidation – started cutting. I cut out the left front, lay the yardage down on the floor and cut a mirrored right front. Then I hung the rest from the shoulders and cut the left back edge; again I lay the yardage down (this time with a fold to eliminate a center back seam) to cut the right back edge. I took the largest piece of scrap, draped it over my arm, trimmed it, and used it as a template to cut three more half-sleeves.

I basted the fronts to the back, as well as each sleeve. If I’d had any sense, I’d have at least noticed the uneven, unfinished side seam hems before cutting the final fabric. As it is, I’ll probably have to do something with flounces or lace to hide how the final hem hikes up at the side seam. Though keeping the hem very narrow at that spot might help.

But that’s not all. Having cut the final fabric, I proceeded with assembly of the mockup, expecting to turn it into a liner, and found that the armholes of sleeve and bodice did not line up. The bodice was bigger. So the mockup started out with a couple of pleats at the back of each armhole, creating rather a lot of drape. I tried tacking it in place, but when it didn’t hold, I decided to implement my first attempt at a fix: taking a little length off the narrow end of the sleeve, bringing the seam to a wider part of the curve. It helped significantly. I realized that I also didn’t take seam width into account on the front of the bodice, so I was afraid I’d have to overstitch the two layers, possibly with a framing ribbon in front, to compensate.

Then disaster struck. I had only rotated the pattern piece for the final fabric of the front around, not over. I had two right front pieces, instead of a left and a right. After some panic and swearing, it occurred to me that the piece wasn’t too far off of being symmetrical, so decided to adjust one of them to fit. I trimmed the side that would become the front opening and added a gusset to fill out the armhole. Not nearly as awkward as I’d been afraid of!

I added some more tucks and darts to the mock up, then assembled the final version and did the same to it. Then I took a break to make the puffed inner sleeve. I started with the same sleeve piece as all the rest, cut some rectangles for cuffs, and started putting basting at the lower extremity of the sleeve to find out how much gather would fit. I got my cuff steps out of order briefly, so one edge of a cuff has overstitching when it should have been turned wrong side out and had the edge stitched that way before going back to right side out to stitch to the gather.

Then I had to decide what order the sleeves would sit in. I wasn’t sure whether to use the mock up to line the final sleeve, or to puff out the inner sleeve. The latter won – the white would have looked weird inside the blue sleeve, and the stuffing helped a lot! I was also able to take advantage of that decision to attach the inner sleeves with a half circle of stitching on only the top half of the mockup’s shoulder seam.

Another mental wrestling match with spatial relationships later, I put the final version on the dress form first, right side out, followed by the mockup, outside out (which technically is the wrong side, because I want all the seams and tucks hidden between the layers). I pinned (for once!) all around the front opening, then stitched the layers together. Flip the final layer from the underside to the overside, stuff the inner sleeve into the outer sleeve, and it’s ready for hemming and embellishments. Which will have to wait for another day.

Planning a Historical Mashup Gown

Back to costumes! Immediately after I finished my holiday dress, I wrestled my old powder blue floral prom dress onto the dress form. I’d been wanting to use it as the base for a historical gown for ages, and I’d just retrieved it from my mom’s house in the great stuff shuffle of 2016. Then I went to my costume textbook for reference information. I really wanted to split the overgown down the front, and display the prom dress as a fancy “petticoat”. That design inspiration meant I had two major choices: Elizabethan or Baroque.

A portrait of Elizabeth I as a princess that was printed in my costume textbook; here, of course, simply lifted from elsewhere on the internet.
A portrait of Rubens’ wife, also printed in my costume textbook and again lifted from the internet. There was another I preferred in the book, but didn’t find quickly online.


Then I realized the prom dress was A-line, which means whatever I end up with is going to be some kind of fantastical mashup. And whenever I get around to really making dresses from those eras, period undergarments are going to be a must.

Still, I dug around in my fabric stash to see what would suit. Most of the cool colors were so dark they washed out the powder blue, but ultimately I found some shiny darker blue I like quite a lot. I got it draped around the dress form (inside out!) and found I was terrified to start cutting. So it looked like I would have to finally go through the extra steps so often recommended of building a mockup.

Renaissance Lady

14138238_10100538494893866_271882266984038703_o

Let me tell you, this costume was a long time coming. I started on it a year or two ago, and chickened out just before I got to the zipper. So it sat and sat in the basement until we finally made that commitment to go to the ren fair, and I sewed my little fingers off making costume after costume.

I call it my fantasy renaissance dress. The pattern is pretty good, actually (Simplicity 8735), but the fabrics I’m using are incredibly synthetic. Piecing it together from my stash felt a bit like a work of art. I had enough light blue textured fabric for the front panel and the sleeves, enough sheer purple fabric for the overdress and what I’ve been calling the “gauntlets”, enough white fabric for the underdress minus the front panel (well, except for a little missing chunk), and enough dark blue sheer fabric for the modesty panel and the “gauntlets”.

I don’t really remember assembling the bodice or the skirt, it’s been so long. I do think I was surprised how well that portion went. I definitely remember the silver fleur-de-lis ribbon I grabbed from my stash to line the waistline and the edges of the overskirt crinkled like mad. Leaving it on my dress form for months on end actually helped it flatten a bit, but it still pulls up some. I went wild at JoAnn buying extra ribbon and lace for the bodice, which admittedly looks very nice. I hand sewed it on during a D&D session. And then it sat.

I got it out again this summer and finished gathering the sleeves. I repeated the USB cable trick to shove elastic through the gather. And then, terrified it wouldn’t fit, I sewed in the zipper. Wrong. Twice. Once I got the zipper in right-way round so that it could, you know, zip…it fit! Sort of. The bodice kept falling off my shoulders, I found a shortcut – put a dart in the neckline above each shoulder blade. I think I took 4 inches off! I hemmed the underdress and overdress (cheating, by machine) both a bit shorter than I’d intended but the ankle-length result turned out to be a perfect choice for the ren fair, what with all the mud. And I made one set of reversible oversleeves and set their grommets (tricky with that flimsy fabric!). Pre-lacing them was a mistake, as one shoulder then didn’t want to sit right, but one came untied partway through the day and I tucked all of them away.

Of course, a dress does not itself an outfit make! I grabbed brown velvet slippers at the costume shop, wore a necklace that had been my grandmother’s, and approximated a cap, ferroniere, and Italian style hair wrap out of a yarmulke and ribbon. Cheating, I know. I also carried a bag my aunt and uncle bought for me in southeast Asia that color coordinated nicely. I’d like to build an actual cap, add a dangling “jewel” to the ferroniere (or actually buy a real one), tie down the wrap tighter so it doesn’t come undone, and use the bit of brocaded silk in my stash to make a new handbag for future outings. Plus, like Irene, it could use a couple of petticoats.

Once again, we were invited to participate in the costume contest, but with better shoes (and extra arch support tucked inside!) we wandered far and wide for food, vendors, and entertainment. All in all, a lovely day, even if my outfit was a century out-of-date and several hundred miles south. Frankly, I prefer this profile to the wide skirts and stiff bodices of the Elizabethan court.

Renaissance Man

My renaissance man (all from Simplicity 4059) turned out to be an interesting exercise. Each piece went together very differently.

13913782_10100528881768646_3536495769886539976_o13909353_10100528881688806_2665088002936656778_o

The doublet – fancy gold paisley on shiny black brocade and black liner and thread from the stash, plus ten phenomenal gold buttons my sister picked out at Field’s. I faced quite a dilemma cutting this one, since the armpit/shoulder angle is quite different for each size, and I had to make a multi-size fit. As with Sherlock’s vest, I cheated and didn’t line this piece, so it too is a bit flimsy. I ended up taking in a bit at the back of the neck to improve the fit, but we’ll need to switch from loop attachments for the buttonholes to actual buttonholes, which should snug up the fit some more. I’m going to recruit help for those.

The shirt – off-white cotton purchased for 14124450_10100534014921766_8135100569807480212_othe project, plus white thread, interfacing, 2 mother of pearl buttons, and lace from the stash. This piece was a joy to build. The fabric moved so consistently through the machine that I felt like I’d suddenly gotten massively better at sewing. I hand sewed the cuffs and hem just like I was supposed to, and it is clearly the most proficiently-built piece from the entire weekend.

The breeches – green fabric, interfacing, lacing, and thread from the stash, plus 3 neat black buttons my sister found at Field’s. After the shirt, this piece was a nightmare. For some reason the fabric was double thick, but when you pulled the layers apart (which was quite easy) it was no longer fit for use. Luckily I figured this out before cutting. The grain would not behave, and I had the darnedest time telling what the pattern was asking me to do. I put the yoke together wrong – wrong pieces, and sewed terribly off-kilter. The best that can be said is that I got to practice putting in grommets with the tool I’d bought over a year before (and I had enough sample grommets to do
them 14086278_10100537213252286_8151797378300252391_oin green!). Oh! And I discovered that the best way to thread lacing through the hem at the knee is to take a USB to mini-USB cable and inch it through, then tie the lacing on and pull the cable back. At least they fit, and the yoke is more or less hidden by the doublet, not to mention accessory #1:

A sword – what can I say? Jeff likes swords. They’re proliferating, so it’s nice to have an appropriate one he could simply pull out for this costume. We belted it on with a regular belt and some kind of cheap holster-y thing off Amazon that you drop the scabbard into. Of course he also wore:

Hose – from the local costume shop. Not actually hose, he tells me. They’re socks. And he’ll probably need points or garters or something because they kept drooping. Anyway, the point is his lower legs were covered. And he also wore:

Shoes – we didn’t like the options at the costume shop, so picked up a pair of jazz shoes at the dance wear store. But of course nothing is complete without:

4177_576356071057_1506708_n
The re-used hat and high school renaissance outfit.

A hat – we actually used the hat from his last renaissance outfit (which since it was from high school no longer fits). It would be good to rebuild it in a nicer fabric, but in the meantime I picked up a peacock feather and sewed it on.